

Convertible 900 Project
Forum / Övrigt / Projekt / Min bil / Convertible 900 Project
- Detta ämne har 3 svar, 2 deltagare, och uppdaterades senast 2013-10-27 22:35 av
emmett jenner.

-
FörfattareInlägg
-
juni 2, 2013 kl. 21:57 #7362
I’ve been lucky enough to get the chance to upgrade my daily driver. The old 8v which has been good for the last 8 or so months will be going back where it came from and to replace it I have managed to find a tatty old convertible.
The car was delivered on the back of a low-loader. It has no tax and no MOT. There was an attempt to pass an MOT last year and it failed on problems with the rear lights. All that needs doing is to fix the rear lights. One has a hole in so water will be getting into it which is causing the brake lamp to flash in time with the indicators.
There are so many problems with this car it just ins’t funny. When I first got it the drivers window was sticking up outside the edge of the roof. This created a gap and I’m sure this allowed water into the interior. I can’t see how it wouldn’t. I also wanted to fix the rear lights so I could get the MOT asap but the boot lock wasn’t opening.
The first thing I tried was to fix the central locking. The wires were disconnected from the central locking motor and the linkages were all messed up. I put those back and got the central locking to work but it turns out the rear lock still does not operate as there seems to be a problem with the boot solenoid. Tried changing the control module but no different. I also don’t have a key for the boot lock.
While I had the door card off I thought I would fix the problem with the drivers door window. I had no idea this was going to be such a challange. The inside of the door has been messed up really badly. People have been working on this in the past and some horrible things have been done. This is the first time I have worked on the doors of a convertible so a small learning curve for me. The convertible doors are a customised coupe door. They have the window frame cut off, different window, different door mirror and it also seems like a different window regulator?
The motor for the window was only clicking and not doing any more than that. I couldn’t find a replacement motor because all my parts aren’t very well stored and there was too much mess. I decided to try and repair the original motor. I got the motor to spin at a healthy speed as there wasn’t anything wrong with it. The actual problem is the motor gearbox. There must be a chipped tooth or something. It goes around ok but makes lots of noise and keeps getting stuck. I had to go back to parts storage and have a better look for that motor. The motors are handed. Needless to say I found two for the passenger side and after about an hour I managed to find a drivers one.
That solved the problem with the motor. But wait, there’s more. Remember the window was going too high and finishing up outside the roof. Well because the doors have no frames something else has to stop the window in the up position. The custom work which went into making this into a reality is quite amazing. Saab obviously completely hand-built every convertible door. I can tell because I can see the felt-tip pen marks on big blocks of aluminum which are bolted to the bottoms of the windows. Instead of the top of the door frame stopping the electric window they have blocks of aluminum bolted to the bottom of the windows, off these they have a plastic wheel bolted on which hits a ’stop’ inside the door and this stops the window. It is all adjustable. In the case of this car the plastic wheels had disintergrated so I had to make new ones. I did this by using radiator bushings which hold the top of the radiator inside the engine bay. I had to cut them down slightly and I had to make lots of custom bolts to hold them on with. There are clearance issues which mean the whole assembly has to be very thin and is pretty intolerant of bolt heads. They have to be removed or lost. There was lots of welding. The front stop bracket was also missing. I decided not to replace this but I did need something to guide the window as it dropped from the top position into the groves in the door. I used a rear seat-belt anchor bracket which is normally mounted inside the car under the rear seat. It is thick metal and has rounded corners so it seemed like the perfect part. I had to weld on two bolts and drill holes in the inner door skin so there was something to bolt the bracket to. That contacts with the rubber radiator bushing at the front and pushes the window forward as it drops down. Without this guide when the window drops it smashes into the top of the rear guide and makes a big ’clonk’ noise as the window first starts to drop. The mechanisim allows the window to slide back and forward along the horizontal and the front bracket makes it slide forward as it drops. This keeps it away from the rear guide as the window falls.
I also had to weld the back of the pivot where the spring sits on the window regulator and I had to reinstall the spring. The spring counteracts the weight of the window so it is easier for the motor to raise the window. As the window lowers the coil tightens, when you raise the window the spring uncoils and assists with the lift. It had fallen out because the centre fixing point had detached and allowed the spring to become lose.
In pratice the convertible window is pretty complicated and it took me a whole day to fix it. Now it works perfect. It would have been a lot easier if I had another perfect convertible door sitting there with all the parts available to transplant. No such luck though.
The clutch slave cylinder had popped out and jammed the clutch in the open position. This was actually the first job I did. I replaced the slave cylinder. As I had to take off the EGR pipe to access the clutch I decided to leave that off and I capped the ports on the exhaust and inlet manifolds where the pipe normally joins.
There are many many many problems with this car. But I’m steadily working through them as obviously I can’t wait to turn up the boost, jump in and get motoring.
Wed May 25, 2011 1:01 pm
Got an MOT yesterday.
On the way to and from the test station the car seemed like it wasn’t running right. Too slow.
I decided to do all the checks and adjustments to make sure the settings were right. A ’tune-up’ if you like. This is a bosch car with the adjustable air-mass-meter and as that should be set when it is off the car I decided to start there. It was way out of spec. The book figure is 380 ohms but it was measuring 891 ohms. I reset that and put it back on. The car still started like normal so assumed job was good. I set the ignition timing and replaced a few split vac hoses. Then reset the idle speed. I changed the distributor as the old one was leaking a lot of oil. New distribuitor o-ring. Reset the throttle damper as well. That was too far from the stop and wasn’t damping the throttle on closing like it should.
Will check the seat-of-pants performance later but I can feel a serious bit of APC modification happening pretty soon.
Thu May 26, 2011 2:21 pm
The tune up wasn’t successful. I suspect an issue with the ignition timing. The original distributor was leaking a lot of oil so I changed it for one which looked externally similar but had a different bosch part number.
It seems like the ignition retard capsule isn’t working properly. The engine runs ok on what I would call normal timing but when it goes to change to the ’other’ timing position the engine missfires. I am getting the correct 16-degrees BTDC timing at 850rpm according to the manual but it is not working on boost. It works ok up to about 2000rpm and then it goes completely flat and missfires making rapid acceleration impossible.
Think the plan now is to return to the original distributor and replace the o-ring on that. It seems like the oil was leaking through the distributor body and ending up inside the dissy cap. I’m not sure if simply changing the external dissy o-ring will stop that leak but no harm in trying it first. If I don’t have any luck then I’ll have to find a good replacement dissy or say to hell with it and convert to T5. I hate the mechanical ignition system but installing t5 is a fair bit of work, even for an expert like me!
Fri May 27, 2011 8:54 am
Before switching back to the old dissy with the oil leak I thought I might check the capsule as it seems like that was causing the problem.
When I took the capsule off I found it had been modified unsuccessfully. I don’t know where this distributor came from but I can see why it wasn’t fitted to a car. 😆
All I had to do was switch the capsule over from the old dissy. The timing then had to be reset as the capsule pulls a little swing-arm inside the distributor which changes the position of the hall sensor and that changes the iginition timing. The length of the capsule rod had been adjusted so the timing was way off.
I modified the APC controller by adding a higher ohm pot in place of the original F-pot and I replaced R42 resistor with a wire. I didn’t make any adjustments to begin with so it could be set anywhere. I also fitted a knock LED and felt that if there were any problems when testing acceleration that I would see the knock LED flashing so there was nothing to worry about and I could just take it easy instead. I tested the knock LED by banging on the knock sensor. The LED flashed and the APC solenoid rattled so everything is working.
This is how I was checking the RPM when setting the ignition timing. Nothing new here, people have been doing this since the beginning of time, but just thought I’d share the method here. The multi-meter has a function for checking RPM. The positive probe goes on the coil – side. The negative probe goes to earth. The RPM is then shown and you have to multiply the figure by 10 to get the actual rpm. In the photo it shows 84 – this means 840rpm.
The nice thing about this car is that despite all the problems it has, bodywork is not one of them. It had faded paint when I got it but that has polished up well. There is very little external rust, just a small patch on the drivers door which you can’t see. I’ve not seen any rust on the underside as of yet. It also passed the MOT so there can’t be anything too bad going on.
The performance isn’t right yet. I can see it’s trying hard to make the boost but there is something holding it back. I am getting a wavering feeling where the boost goes up and down as you try to accelerate. The knock LED does not come on so it isn’t the APC detecting knock.
I highly suspect a problem with the movement of the wastegate. When I check I’ll probably find it does not move smoothly.
The exhaust is also rattling a lot. I think one of the rubber mounts must have broken.
Fri May 27, 2011 4:31 pm
The wastegate arm seems to move around in the diaphram in an unusual sort of way. I have not done much with wastegates over the last year or two so can’t really recall exactally how they should feel but I instinctivly feel like it’s not moving right and likewise from what I remember about how they should feel it also seems wrong.
Normally I would use a bicycle pump with a gauge to pressurise the line that feeds the wastegate and then I could see if it was moving smoothly or not and what sort of pressure was needed to move it. I don’t have one of those pumps handy at the moment so I’ll probably just get my hands on another wastegate actuator for comparison. If the other one feels different then I’ll fit it and see if it works better.
Mon May 30, 2011 9:03 am
Well there was nothing wrong with the wastegate actuator as I’ve taken it off, checked the swinging door moves eaisly and fitted a newer alternative actuator. Same problem.
Something I should have done earlier was to do the simple tests you should normally for narrowing down boost problems.
Checked it with the APC solenoid disconnected and got very stable and very plausible base boost.
Checked it with the wastegate hose disconnected and I’m getting mega boost.
So the wavering boost is an APC problem. The knock light has never come on during any of the testing so the APC isn’t responding to knock and lowering boost, it is just failing to control boost properly.
I have tried replacing the APC solenoid but that made no difference so I think it’s time to change the APC controller. If that works then I’ll have to modify the new APC controller as well. Not the hardest or most expensive job so that’s alright.
Tue May 31, 2011 5:51 pm
I got some new wheels. I managed to find these Team Dynamics 17-inch Monza’s for a very low price on eBay.

They have a Vaxuhall badge in the middle at the moment. That can be changed to a Saab badge though. The reason I think they were cheap is because they used to be bright pink.
When I was buying them I pointed out to the lovely chap who was selling them that some arse had painted them matt black without bothering to take the tyres off, mask-up or anything. He went a little bit quiet at that point. The quality of the matt black paint job is super low. You can see just from putting them in the car I managed to scrape a layer of paint off already. Can’t imagine what they would look like after a carwash. I’ll have to repaint them, but I knew that when I was buying them. I think GOLD is going to be a good colour. 😆
Wed Jun 01, 2011 6:53 pm
Decided to retrim the door cards. The plan is for it not to cost much but for there to be an improvement.
So for the price of a can of heat-resistant contact adhesive, 2 scrap door cards from a 900 3-door and headling material left over from another job I am improving the situation.
Ideally I would like different colours and all that sort of thing… but this will do for now.
The starting postion is sorry looking. I hate those kenwood door speakers as well. I’ve seen telephone handsets with bigger speakers in the ear-piece. So they’re going. Hence requirement for two replacement door cards.
The rear ones are the wrong colour. So I’m going to do those as well even if they aren’t sagging.
These are the spare ones for the front which I will recover
Started pulling the fabric off the rear ones and then realised there will be a problem. The speaker grilles are black. They will have to become some sort of cream colour. Will get an aerosol from Halfords with a good colour match to the fabric and paint them with many coats until they are well painted. I had thought about leaving the grilles off but then people would poke their fingers in the speaker cones – as they do.
Done both, this is what the front passenger side looks like. The fabric has some creases in it because it is the end of the roll and wasn’t stored perfectly.
This is the drivers side.
I fixed the boost problem for now. I just disconnected the wastegate hose. The car is well fast. 😆 No APC control though. I have to behave sensibly with the throttle, like if the engine is cooking hot I shouldn’t give it full boost as nothing will stop it knocking if it is. I’ve still got the dash LED to show if knock is happening but can’t see it when the roof is down, which is always… 😆
Thu Jun 02, 2011 6:13 pm
Actually I think I’m going to leave the springs and wheels as they are on this car.
I had planned on messing it up by lowering it and making the wheels big but I’ve changed my mind. I think I prefer it as it is. I’ll put the big wheels on the track car instead.
Fri Jun 10, 2011 4:33 pm
I finally got around to doing the rear interior pannels. Nutcase watched me do the first one but then he had to go back to work. 😆
They were like this. I don’t think they were right for the car?
I painted the speaker grille and goggle-eye frame using Ford Dove Grey – seemed a good colour match to the fabric was using.
Tue Jun 14, 2011 10:58 am
Hmm, lucky you for spotting the latest way Saab is doing itself in. I would just buy a Vauxhal Insigna instead. Why not. ❓
At least if you got the popular one then there’d be some support for when things went wrong.
I’ve found the ’Previous Pictures’ from before I got the car.
Fri Jun 17, 2011 9:57 am
This is how it looks at the moment.
Sun Jul 10, 2011 10:16 pm
Changed the waterpump today. It has been a little pesky right from the time that I got the car. Unusually it seemed that if the car was stationary the waterpump would squeal forever. As soon as you moved a little bit the noise would quieten down and mostly stop. Once moving at 20 mph it would go completely. For the first few stops after starting it would chirp a little bit at junctions a few yards away from where it was started. End of the road etc… This is why it has taken me so long to get around to changing it… because most of the time it does not make any noise! – It was a little embarrassing though. Worst time for a car to make a noise is when you are moving away from a parking space or out of the end of someone’s road. Does not matter if it sounds a bit wrecked when you’re doing 40. Squealing waterpumps always make a car sound knackered.
Sat Jul 23, 2011 8:43 pm
Started repairing the roof today. It had a few slashes in it after some knuckle dragger put a knife through it. This didn’t happen while I owned it. I had the pleasure of inheriting that feature. The previous owner put some repair tape over the top of the slits but the biggest one had started to peel off and was flapping in the wind. Something had to be done. 😯
I’ve used a square of roof material taken from a scrapped GM900 vert to patch the slashes from underneath. That is better than having tape stuck over the top.
I tried cleaning off the glue from the tape with cellouse thinners. It mostly worked.
I used Sika EBT to fill in the slits to try and make the lines disappear. That’s going to need some more work though.
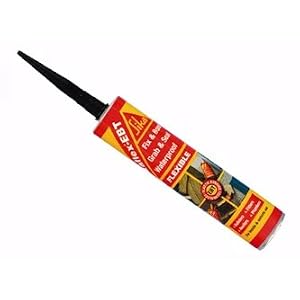
The main reason for buying the Sika EBT was to reseal the rear window. The same old problem which happens to every c900 vert where the lower fabric border on the rear window had peeled away allowing water to get into the hood bag. I took the window section off the car as I couldn’t imagine being able to seal it up while it was still in place. With the window and fabric frame on the floor I did the outside first, waited for a couple of hours, turned it over and did a much smaller section (about 4 inches) on the other side.
To take the window out I had to remove around 200 staples from the bottom of the roof where it joins the body. All the old staples had rusted so wasn’t a bad thing to replace them. To put the staples back I had to buy a new toy. Air powered staple gun. What a tool! Bang, bang, bang… staples everywhere.
Still want to clean the hood to remove all the dirt and wildlife. Then I’m going to use the Renovo hood treatment to make it black and that product also claims to protect the hood at the same time. Meh, fair enough.
Mon Jul 25, 2011 1:34 pm
This is what the rear window looks like off the car. I used the masking tape to make sure none of the sealant went on the glass.
A better look at the sealant I used. It seems to be ideal for the job. A black flexible filler, sealer and adhesive in one product. If only it were fast drying as well. Can’t have it all I suppose :geek:
This is what it looks like back in the car. It’s pretty much perfect. I’m impressed with the way the glue is holding even though the fabric is stretched down and stapled and screwed to the cars body. This would never have worked if the glue was still drying. I had to leave it about 5 hours before it seemed dry enough to mount it back on the car.
You can see how damaged the roof was before I attempted to seal up the slits. The hole is already patched from behind with roof fabric but the glue from the old repair tape is still there.
This is about as good as I can get it without actually replacing the whole roof. I think this roof is actually reasonably new as there is very little sign of wear elsewhere and its a real shame someone decided it would be better with knife holes in it.
The next job is to use a roof cleaner to clean off all the wildlife and other dirt. Then I’m going to apply the Renovo hood reviver to restore the colour.

When all this work is complete it should be nice and black and watertight! The holes on the top are filled with the Sika sealant so I’ll do what I can to rub them down and create a flat appearance before applying the roof dye. I don’t think they will dissappear completely but should end up looking ok from most angles.
Sat Aug 06, 2011 12:20 pm
Here is how the roof looks after re-blackening. As you can see, now an intense black colour. Top-notch.
Mon Sep 05, 2011 10:44 am
Back at the beginning of August there was a little incident involving the bending of some metal. I was driving down a small side street and some fool pulled out into my path. I did my best to react and avoid a collision but he was just too far into the road and it all happened too qucikly.
You can see from this photo what happened. Not much damage to the front of the car but mostly on the side where the other guy drove into it. He didn’t really damage his car at all, but this being a c900 there is nothing behind that front wing except a load of air. It looks more dramatic than it was due to the way the car has crumbled. The damage was to the indicator lense, a little scratch on the wheel, the front wing, paint chipped off the bonnet and lots of scrapes on the bumper and moldings. I was quite upset about this as I always try to drive carefully so this sort of thing does not happen and I had spent a lot of time on the car already.
The bodyshop fitted a new wing, repainted the bonnet and the bumper so it all matched. Now the car looks great again and I’m really pleased.
Mon Sep 05, 2011 6:56 pm
The shitty RipSpeed leather gear leaver gaitor from Halfords is a pretty good replacement for the standard Saab one if yours is ripped or worn. The one on this car was badly ripped and the leather had lost all its colour. I tried to get one from PFS as I remember they used to stock them. I was assured however that it has never been available from them despite what I remembered.
I fixed it the same way Saab did with the original. You start with the cover inside out pointing up over the gearlever. Then you use a string to tighten the leather into a groove on the gear lever. Turn it back the right way by pulling it down so it forms a little roll at the top and then secure it to the base using the elasticated opening at the bottom. You could change a standard plastic one to this RipSpeed one for a little more luxury in the cabin. I’m bearing that in mind for future! It’s not amazing but it certainly looks very similar to the original and that’s what I was trying to achieve.
I also changed the rear nearside lamp cluster as that has always had a hole in it which I covered with coloured tape to get it through the MOT. And lastly, I fixed the rear interior lights so they work.
Going to change the oil and brake fluid tomorrow.
Wed Sep 07, 2011 7:29 pm
It has a fairly bad oil leak after swapping to nice new fully synthetic. God knows how thick and old the old stuff was. Probably 10w40 mineral oil and 30k old or something like that. Judging by the way the rest of the car has been looked after in the past that wouldn’t surprise me. Fixing this oil leak is going to be fun. Difficult to see where it’s comming from. It still drives alright and the leak isn’t so bad it needs doing immediately but will have to do it soon.
I changed the exhaust today. The part which was on there was so bad it was just stupid. I just can’t understand why anyone would fit that exhaust to that car.
Here’s what it looked like compared to the proper part.
The engine runs much quiter with this new pipe on. I don’t know if the old one was leaking or if the silencer was too small. I don’t think there were any holes in the part I changed and the old backbox looks fine. Wasn’t going to waste any time looking at the old pipe, that’s going for scrap. I’m expecting all of the knocking noises to stop as the new pipe has good clearance all round as I was expecting. I’m also hoping to be able to fly over the speed-bumps in the driveway outside the workshop. I had to do them slow due to exhaust scraping before. Hopefully now there will be some improvement.
Sat Oct 01, 2011 9:29 am
A little bit of news. The car has been driven into again. A lady came out from a side turning as I was going past and hit the side of the car. It will be sorted out but it’s a real pain having to take the car back to the bodyshop. I just wish people would stop driving into my car.
Other news. On the road I found at higher speeds in 5th gear the engine knocks. I’ve got a knock LED and have not seen it come on yet. But as engine struggles to turn the gearbox and push the car at higher speeds accelerating hard the engine starts to knock and that happens reliably at around the same point each time. So if I wanted to sort that out I’d probably have to burn a new ECU chip. I’ve still got the old gear for doing that so in theory it’s possible. Just not sure if I can be bothered. I don’t take the car on the motorway very often and only under exteme circumstances which you can eaisly avoid.
Mon Oct 10, 2011 9:45 am
The car looks pretty awesome from most angles now. The rear end is still a little worse for wear but at the back I have straightened it out, changed the rear lights and replaced the missing chrome bumper strip so now it looks fairly presentable although not as perfect as the front. It’s good enough.
Sun Jan 15, 2012 8:53 pm
Ball-joint done.
Drove to Bedford today to see all the interesting people at the Saab GB headquarters. Was a good day out. Left early to get back to Bromley in time for family lunch.
I had thought my vibrations from the front end had gone. All that seems to have happened is that they happen in 4th gear rather than 3rd. But my tracking is out after doing the ball-joint and track rod, it feels a bit rough going into corners so I want to get that sorted ASAP. Maybe once the wheels are pointing straight the vibration will stop. I think one of the wheels might be out of balance after one or both of the recent accidents. Probably offside front. I can feel that as well.
On the upside I shat all over a convertible BMW E46 325i off one set of lights going through central london on the way up. Saab 900s are hard to get off the line but I was ahead of him for most of it, only up to 2nd gear but he was quite close. Dunno if his ego was affected. 😕
Mon Mar 05, 2012 4:33 pm
The convertible got a lot of heavy use this weekend. Must have covered around 500 miles. I had planned this so before I went I set some time aside for a few little jobs.
I tried replacing the dead dashlamp on the left side of the clocks but the track has gone so does not get power to the bulb holder.
I replaced the exhaust manifold gasket and all the studs. I also replaced the other gasket between the manifold and the turbine flange and fitted 4 new bolts. At the same time I ’upgraded’ the manifold to the type without the EGR lump. I was getting an annoying ticking noise from the engine bay which makes the car sound sh1p so it was a good idea to renew those gaskets.
I tightened the wastegate arm as I was worried that it was blowing open at high boost. I’ve got the wastegate hose disconnected so it’s not being opened by the APC.
I changed the water bottle as the old one was cracked. Just a tiny hole on the bottom but that makes it lose all the water in the tank over the space of about 1/2 an hour.
As a result of the work to the manifold and wastegate I seem to have managed to create a situation where the boost is higher further up the RPM range but the initial boost spike I was getting at the beginning of acceleration seems to have gone. The turbo needle does not go as far into the red zone as it did before. Still very fast, as you should expect from a turbo without any wastegate control.
I still think the engine has some sort of fundemental issue like a failing headgasket or something. I’ve still not checked the compression. While it’s working I’m just going to leave it as I can’t be bothered to do the major work on it.
Gearbox has just started to make a faint pinion bearing noise in 5th. Really the power unit needs to come out for an overhaul at some point. I’m putting it off for as long as possible though.
Mon Apr 09, 2012 8:23 pm
Beat a MINI Cooper S off the traffic lights through first and second. I looked in my mirror as the lanes were about to merge and he was right behind me so he really wanted it. Not his day though.
Wet road so lots of wheelspin… but no different for the other car so fairs fair. It’s just I don’t have traction control and my tyres aren’t as wide so in theory he had an advantage. Just the Saab is much faster so wins despite the wet road.
Exhaust is blowing from somewhere.
Tue Apr 10, 2012 2:30 pm
Clutch is making a funny noise now. Great isn’t it. This car does not stay fixed for more than a week. I suppose until everything has been fixed at least once I should expect constant new issues.
Thu Apr 12, 2012 8:19 pm
yeah… release bearing has collapsed. I’m changing it tomorrow morning. Unfortunately I’ve sold my Subaru Justy so I’m walking to and from work. It only takes 15 minutes so not too bad. Unusual for me to have to walk though.
I feel a bit exposed now, at the whim of the Saab troll. Any time I could be left without a car.
Sun Apr 15, 2012 10:53 pm
Everything went reasonably well. All I did wrong was attempt to change the slave cylinder without bleeding the circuit.
I just removed the hydraulic line from the original while I had the replacement in my other hand, switched it straight in without spilling too much fluid. Believe it or not… this mostly worked.
I still have to bleed the circuit though. The biting point is at the lower 1/3 of clutch travel rather than the usual middle third and it won’t be right until I bleed it. I just couldn’t be bothered as it was starting to rain and getting dark.
Sun May 13, 2012 9:37 am
Did the clutch circuit about 1 day after the last update. Wasn’t a difficult job but I always hate messing around with brake fluid and I never have any time. Clutch is super in every way now. 🙂
Yesterday I replaced the dashboard. Previous mechanics had basically wrecked the original. It had the old problem where the left corner by the centre air-vent was hanging out of the dash by about an inch due to broken clips on the back of the dash. The silver trim was begining to get a bit scratched and crap looking so I changed the dash completely for an updated one from one of the later cars. There were also lever marks around the stereo opening where some fool once removed a stereo just by levering it out of the dash. 🙄
The old steering wheel had the leather split open on it. I’ve changed it but not for my favorite kind of steering wheel, just another leather one. Ideally I want a Nardi wood steering wheel but they’re not easy to find.
Other problems were that most of the dash bulbs were not working and the knee-roll which goes under the dash wasn’t properly fitted and was hanging down.
So lots and lots of work done. In the end it was getting too late to finish the job perfectly so I had to leave a couple of things for another day. The heater direction control has a broken terminal on it so have to change that. Didn’t have time to reconnect the extra gauges properly so had to leave that.
I also changed the speedo. I’ve got a mileage reduction. Now down to 139,000 – not illegal as long as I don’t try to fool some persepective buyer into thinking this car has done fewer miles than it actualy has. I wouldn’t want to do that. It’s really nice to have a speedo which works properly. Does not bounce or stop working or under-read or any of the things the old one did. 🙂
Of course there is always more work to do, but this car is beginning to become pleasurable to own. 😀
Sat May 26, 2012 8:30 am
I like the feeling of the out of control turbocharger. It’s what I live for. It’s like being at the fairground every day.
Fri Jul 13, 2012 9:00 pm
I had to take the new~ish exhaust off today as I loaned the car to someone a few months ago and they hit a speed-bump and busted the exhaust. The MOT is comming up soon and I was really fed up with the noise so decided yesterday would be the day to fix it. Had to cut through it to get it off the car as it was tightly fitted. That was annoying as the exhaust is still quite new so was a shame to have to cut it. Just welded the parts back together when they were off the car so no real harm done.
To fix I had to weld around the silencer as it had started to rip away from the front pipe.
Sat Jul 14, 2012 10:21 am
Here’s how it was leaking. Just stress-cracked all around where the pipe joins the silencer from the front of the silencer hitting a speed bump at speed.
I suppose in fairness I may not have paid enough attention to the business of ground-clearance when I fitted the exhaust originally and so when I let someone borrow my car they had to find out about that for themselves. It wasn’t extremely low though, I found it ok for driving around with. This time I tucked it up a bit closer to the body. It’s amazing how low these exhausts were from the factory. It seems as though they didn’t really think it through when they put the turbo exhaust on. Although they probably also hadn’t planned to sell the cars in a country with road surface conditions effectively like what you’d find in a third-world country.
You can see all the blackness around the front of the silencer. That is soot from the exhaust because the crack goes all around the circumference.
Sun Sep 02, 2012 9:14 pm
The exhaust welded up really nicely. I had to do both ends because the rear edge of the central silencer took a right pounding from the heavy hammer trying to separate it from the rear silencer. I stuck a little skid-plate on the front end of the silencer, something I saw on another OEM centre section… not fitted to this one even though they both came from the same place (Saab City)
Now the car is quiet again.
I got it MOTed and my friend at the MOT station said my emissions were far too good so we adjusted the AMM screw until they were in spec. This extra fuel made a huge difference to the driveability of the car. It had been stuttering on deceleration, that condition actually requires fuel because the car slows down slower than the engine does so even if you are slowing down the engine still has to cycle, just not at a rate which increases engine speed. It also does not missfire at idle which it had been doing before. It is also possible to leave the car for a week and come back to it and it will run smoothly. The idle speed increased so I had to set that lower. The knock stopped so I advanced the timing. Now it is knocking again. In ever gear. I did about 30 miles today through central London and decided to try some ocatane booster as a way of avoiding adjusting the ignition timing. Did not work. So it’s at the point where more fuel would not make any difference. Sooner I get T5 the better.
The trip across London was for the boot lid from the flying dutchman.
This one has just a single dent from the inside which is much better than about 5 in the current one.
I had to re-black the roof again as it was going a bit green.
Sun Nov 25, 2012 1:21 pm
Started to strip out bits of the interior so I could sort the leak problem. As I started to take out parts of the interior it became obvious that I had to keep going.
Now that I’ve done this it seems like it has been leaking for a long time. Not just recently. It was visible in the rear passenger footwell but all floor areas had puddles, the drivers floor was just a bit damp. The drain hole on the rear passenger side was blocked which meant the worst problem showed there.
Now all I have to do is work out where the water is coming in.
Stripping this thing out made me think about a convertible track car. It makes sense because the convertible chassis is a lot stiffer if you were to add 2 or 3 overhead braces to compensate for the missing roof. 💡
With the ECU exposed I’m quite tempted to see if I can find any spare blank chips to write to. I’m sure I have one or two kicking about.
Sun Nov 25, 2012 3:29 pm
I thought the exhaust sounded like it was blowing a bit… guess this is the point of lock-nuts, should have used some 😀
Sun Nov 25, 2012 8:52 pm
Well I wanted to do a new chip while I had all the carpet out. All going well up until the point where I wanted to make the new chip. Unfortunately it seems that if I had any spare chips I seem to have put them somewhere. I ordered a couple of eBay. Hopefully they’ll work. I’ve done the new map but going to have to use the old one for a few more days.
Sat Dec 01, 2012 11:36 am
Even with the large amount of rain we had last week I have seen hardly any water getting into the car.
So the conclusion is that this issue has been caused completely by some arse at the hand-car-wash sticking a pressure-washing nozzle somewhere where he shouldn’t.
A small amount of water has leaked in around the rear window so I’ll check the seal and see if there is something I can do to improve in that area.
The other news is that I got the new blank chips in the post. I wrote the enriched map to one of the new chips and it has passed the first test in the sense that I’ve stuck the ECU back in the car and it starts and revs ok so the chip is good. Will have to roadtest it over the next few months to see if more fuel leads to less knock. Those of you who’ve tuned ECUs before will know it’s not always that simple. The setup has no boost control and almost no control of ignition timing so only really have fuel enrichment left to play with.
Sat Dec 08, 2012 7:12 pm
The chip stutters at the line where I started the enrichment. I’m going to have to make another map with it ’rolling’ into the enrichment rather than ’stepping’ into it. Does not knock though, very fast. 😀
Decided there was a leak so went hunting for it. Wasn’t hard to find.
The corner of the rear window has worn a hole in the fabric. I knew it was there because I saw it when I had the rear window out. Just didn’t think it was going to be a problem because the roof didn’t seem to be leaking. Poured water on that corner of the roof and a fair amount of it went straight through the hole. 😆
I patched it up from the inside and then pumped it with sikaflex from the outside. It won’t leak now. I’ll put the interior back in tomorrow.
Sat Dec 15, 2012 7:56 pm
Tried burning another two chips with slightly different maps on. Unfortunately got some very poor results. I’ve decided to switch back to the standard chip.
The modified chips work well as you accelerate but can’t get them to work well around idle rpms. The engine just hunts. Even with a totally smooth map.
If I want high performance and good smooth running I’m going to have to T5 it.
Had to change the waterpump again. Fitted a new one this time.
Mon Feb 25, 2013 1:33 pm
So we’ve had the broken turbocharger scenario and recoverd from that: http://www.saabsforum.com/viewtopic.php?f=5&t=539
It started with an oil leak, then a cracked turbo and now it has a hybrid as a replacement. Cheeky upgrade. Unfortunately that does not help with the transmission which is getting a bit noisey at the pinion bearings.
While the turbo was off I chucked in a replacement front engine mount. The old one had snapped. I also modified the brace which goes across the top of the engine mount by welding in a 1/4-inch piece of bar to the underside of the brace to eliminate the gap and stop the engine rocking back as much. That will actually stop the engine mount from breaking again. It won’t be able to stretch as far so is unlikely to snap.
Sat Mar 09, 2013 9:35 pm
The knock is far more under control now.
I retarded the timing 3 times to try and get it to stop knocking. I might have had it too advanced in the first place as I had to remove the distributor to replace the turbo.
Not sure if the 5th injector is working or not. I’ll have to get the bicycle pump and pressurise the vac line running to the pressure switch to see if the injector is engaging and at roughly what pressure.
Even with the ignition timing retarded it is very fast.
One issue which seems to have appeared post turbo upgrade is a sort of hissing and drop in power at higher rpms. I think this is the stock by-pass valve opening up and bleeding off the boost. Either that or some of the jubliee clips which I know aren’t very tight are leaking. More likely the by-pass valve though. Stock hoses are all physically secured with humps on the pipes so they can’t slip off completely.
Sun Mar 10, 2013 1:26 pm
Got it spot on now.
Realised I had connected the 5th injector to the pulsing signal from the ECU or that I had somehow managed to wire it so that the 5th injector was pulsing in time with the main injectors. Really I just want it to turn on at high boost.
So now it is all right and the car is insanely fast. I think now the clutch is slipping.
With it being as fast as it is it won’t continue to work flawlessly for long. Something will break. Just not sure what.
Thu Apr 04, 2013 8:45 am
That was unnecessary panic. The clutch is fine. The boost has brought on an issue with the by-pass valve though. Not at all up to the job. It hoots when you let off the throttle. I’ll get round to changing it for a shiney forge one at some point. Cycle of mods here we come.
Sun Jun 02, 2013 10:45 pm
Have not updated this for a while. I was getting annoyed with a leaking exhaust (again) – I realised looking at this topic today that it has been a year since I repaired the last set of leaks so it isn’t so bad.
At the moment the car drives but really this thing should be fully restored. It is such a tired car but I keep pouring in more coffee and it keeps going.
Here is the job I did on the wastegate back when I changed the turbo. I took a picture at the time but only just got around to posting it. This is the upgraded turbo with Subaru Impreza compressor wheel and ported turbine housing. Boost o’clock.
oktober 27, 2013 kl. 21:08 #57091Back from the bodyshop. Wasn’t expecting to have to refit the majority of the aero kit… 😕 so tomorrow appears to be all mapped out for me. On the plus side… although it’s difficult to see in the photograph the paint is now perfect, every panel is dent and scratch free and all the same colour… I doubt it’s been in this sort of condition for a long time. It’s always been a pleasantly rust free car but the overall condition of the bodywork looked like it was 24 years old. It cleaned up nice enough as it was but I’ve been wanting to get it properly painted for a long time.
Booked in to have the roof changed and the seats refreshed early November. In the meantime I’ll be swapping the engine and converting it to T5. Watch this space.
Cleaned the oil and dirt from the engine bay. Oil leaks, 25 years and 160,000 miles worth of use. Lots of dirt, lots of oil.
Very pleased to find no rust. A bit of surface blemishing but no bubbles, no corrosion, no flaking… it’s really quite impressive. For example… look at the front cross member… it can be a bit of a hot-spot for rust… some of the cleanest cars externally can have big flakey chunks of hidden rust along the front cross member. It’s under the radiator and exposed to weather as the front facing part of the car. The driveshaft tunnels are totally solid, no sign of any corrosion. To make it perfect you’d have to strip it out, i.e. remove all the hardware, bit of sanding to prepare it and then it could be painted as it is!
Few more bits done, more parts arrived.
Reconditioned steering rack installed and I’ve resealed the supply hoses.
New Bilstein shocks.
Flywheel with the CNC pattern for the crank sensor
A lovely cam cover
Also have to renew front and rear brake pads as both have worn quite thin. Anyway, better get on with it. Lots to do!
Here comes the motor 😀
I have a few more pieces to bolt on and the crank sensor hole to drill.
Turns out some daft bugger who built the gearbox (long before I was getting involved in these things) messed up the job. I had the engine back in the car, installed the driveshafts, oil cooler lines, speedo cable, engine mounts and exhaust. Came to connect the gear linkage and line it up but the bloody thing does not select anything other than 1st or 2nd.
So now the engine is back out of the car and I’m going to have to take off the primary drive housing and reset the spring on the gear selector rod. 👿
At least I haddn’t got too far with the engine installation. I reckon this is going to set me back a good 4 or 5 hours!
Here we go… This is the pin in the primary drive housing. That pin centralises the shifter shaft so when you move the shifter left or right it will spring back to centre.
The selector shaft was positioned at spot 1. So it would be impossible for the shaft to rotate. 🙄
When I put it back I will have to turn the shaft slightly and put the pin between the two ends of the spring in position 2.
All back together now. Flanges cleaned up and resealed. Works now. So annoyed. That was a whole day wasted. 😥
Tomorrow I’ll put it back into the car and just see how far I can get.
Yes, I like a little bit of good quality improvement where possible. Difficult to improve on an already pretty good design though.
Still a bit annoyed by yesterdays setback. I wanted to be much further forward by now. I was hoping to have the engine started by Sunday afternoon but not quite got there. 🙁
So still left to do:
– hook up intake hoses
– coolant hoses
– bumper, lights and grill
– reconnect wires for engine equipment
– complete T5 wiring
– reprogram the T5 ECUI suspect the car would start and run ok with the existing ECU program but I doubt whether it will be agressive enough as the donor car was LPT. I also want to turn off the lambda.
You can see some things in the picture above showing some of the little changes I make when putting in the T5.
1. The trionic ECU is mounted where the original APC would be mounted. You have to remove the ECU board from the shell and flip it round so the ECU plug points away from the wheel arch and the wiring can come forward to follow the standard wiring route around the inner-wing.
2. Can’t quite see it but replace the AMM with a piece of stainless tube. It must be a standard diameter like 3-inch as I always seem to have a bit of tube hanging around.
3. Make a little gap between the coolant bottle and the intake snorkle by cutting a few inches off the bottom of the snorkel so it can be moved closer to the front of the car. Then you can clip the MAP sensor onto the inner wing between bottle and the snorkle as in the picture.
I’ve left the original circular locking body interface connector from the 9000 on the ECU wiring loom. Worked out that you can eaisly remove the unnecessary pins from the body side of the connector so that is perfect for properly terminating unused wires. The unused wires stay in the engine side of the loom but don’t mate up to anything in the body side of the connector.
This is the minimum number of wires I think are required for the T5 conversion with this particular set of loom and sensors.
I traced it all back and I’ll wire these two connectors into the car. Once that is done the Saab 9000 T5.5 loom will be plug’n’play
A bonus of keeping the existing T5 wiring loom and not making any changes is that it’s originally positioned under the inlet manifold. As I’m trying to replicate the T5 setup as close as possible I have the idle control valve mounted under the throttle, same as the 9000. I also have the wires for the injectors coming in under the inlet manifold the same way.
Also, something else new are the clips on top of the connectors to the injectors. I was reading the other day that the T5 injectors have holes in the bottom of them which direct a jet of fuel precisely in the correct direction. The plastic braces between the connectors are meant to fix the spray pattern for the injectors in the correct orientation! So they aren’t just for making it look pretty, they keep the injectors mounted straight so the fuel sprays correctly into the engine.
I’ve adjusted the ECU image so the lambda is turned off. I used the tuning wizard in T5 suite to bump up the boost, fuel and ignition details.
Started installing the keyless entry as I have to do that before I can finish the wiring. I’ll be opening the wiring insulation down the inner wing on the left side between the fuse box and the front of the car. It is better to get the alarm wiring tucked into there at the same time as the ECU wiring rather than doing them separately.
Here’s an engine bay pic.
oktober 27, 2013 kl. 22:35 #60552Before the turbo upgrade. Before fitting t5.5 – this was with the standard TE05 and some of my tuning. :ID
-
FörfattareInlägg


- Du måste vara inloggad för att svara på detta ämne.

